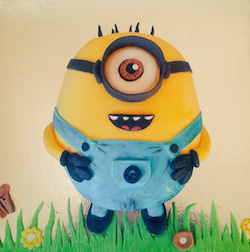
So surely I can’t be the only mum out there who has wondered “Can I make a themed cake myself or do I really have to pay $150 – $200 for something amazing!?”. With that in mind and the fact that my Mr 4 is having a Minions themed party over the half term holidays I have set myself the challenge: make a Minion cake!
I am pretty much an absolute beginner when it comes to using fondant, I have made some little animal cupcakes about 2 years ago and other than that my experience is zero. So really I have no idea what I am doing. (A friend who can use fondant gave me a few hints and tips and I have used these, yay for friends!)
I started by reading a few blogs on using fondant and watched a few Youtube tutorials.
Yes – they all make it look SOOOOOOOOO easy. No – It is not that easy! The people making the tutorials are normally professional or very experienced bakers, so it is easy for them, but was not as easy for me. However those tutorials are really helpful in getting ideas of where to start, what to do and planning your cake. With all that in mind, here is what I did, I hope this helps some other mums have the confidence to try something like this! You can do it!
The first thing I did was plan my cake, I decided on a lying down Minion as I just felt the stand up ones were too complicated. (I had a vision of a collapsed sad looking Minion in the middle of the party table, not great in all fairness). Then I figured out what colours of fondant I would need, yellow, yellow and more yellow, plus blue for the overalls, and a few small amounts of other colours.
I used a well known baking website and ordered all the fondant I would need, the cost was just over $30 including delivery, not bad. I decided to buy pre coloured fondant as having never used it before wanted to make it as simple as possible and not have to dye it all myself! But you could be brave and buy white fondant, which you can get in all the big supermarkets in the baking aisle, and dye it yourself.
The next step is to make your cakes, I made 3 chocolate cakes using a Dean Brettschnieder recipe from The Great NZ cookbook, but you can use any recipe you want as long as the cake is not too light, fondant is heavy so you need a sturdy cake that will hold up under the weight of all the icing! The recipe I used worked very well, so I would recommend it if you have that book.
So… the cakes are made, fondant is ready to go, it’s time to build a Minion! I drew a Minion on a piece of A4 paper that would roughly be the length and width of my cakes, this gave me a template to use to cut my cakes into the correct size. I made the cake into a sort of rugby ball shape, I tapered the top and the bottom so it was the rounded shape of a Minions body and head.
Next I made a whipped raspberry buttercream icing and assembled the cakes which I had roughly cut to size, I iced between each layer and then over the whole top of the cake. This left me with a sort of iced rugby ball shape. So far so good!
Now the tricky part, starting with the fondant. I got all my fondant out and ready and opened the yellow packet first, when I opened the pack the fondant was really quite hard, I had to knead it for a good ten minutes to get it soft and supple enough to roll out. When kneading I kept my work surface dusted with cornflour, NOT icing sugar, apparently cornflour is better for dusting fondant (Don’t worry if it makes the fondant appear to have a white powdery finish as you can wipe that off later with a tiny amount to water on a cloth).
Rolling the fondant out to a large enough size to cover the cake is tricky. I didn’t measure it I just did it by eye, but you would measure your cake first to ensure you roll the fondant out to the correct size. I covered the table in cling film and then dusted the cling film in cornflour. The cling film meant that once the yellow fondant was rolled out I could slowly lift it up without tearing it and place it over my cake. It still tore a little in a few places.
There were a couple of tears where the Minion’s trousers would be, so I sensibly ignored them. One was on his side, and annoyingly I couldn’t ignore that! To fix it I got a tiny bit of water on my finger and slowly massaged the tear until it had repaired! It worked yay! I cut round the bottom of the fondant with a sharp knife and gently pushed the fondant into the bottom of the cake.
Wow, now I have a yellow Minion shaped cake! To be honest I wasn’t even sure I could get this far!
Then I cut out the Minions outfit from my hand drawn paper template and rolled out the blue fondant so I could pace the cut out on it to get the fondant to the correct shape. I placed the blue fondant on the cake and made two little blue shoulder straps and placed them on too. I also cut out a little semi circle to stick to the front of the dungarees for his pocket.
To attach the blue fondant to the yellow fondant I used the smallest amount of water, don’t use too much as the fondant will slide right off, you literally need a touch.
The next step was to make the dungarees look a little more realistic, I got a brand new scouring brush and rubbed it over the blue fondant, then I used a skewer to put little thread marks all around the seams and to make seam marks for the side pockets.
Now to the eye. I used a small cup to cut out a piece of white fondant and then stuck it to the cake, and then I used a tiny amount of rolled out yellow fondant to trim the eye. For the middle of the eye I used a brown circle of fondant, with a black circle in the middle and a little white dot to make it appear realistic. To give the eye a better appearance I used a skewer dipped in watered down black food dye to make little lines all round the brown piece, but you don’t need to do that as it would still look fine just in plain brown.
I really hope this is all making sense!!!!!
Then I cut out two black strips of fondant to make his goggle straps and attached them from the eye down the side of his head.
The goggle was next, I dreaded this!! I made a cylinder of fondant and popped it in the freezer to firm it up a bit, once it was hard I had to re size it slightly and then I wet the edge and attached it to the eye. This was a really tricky part but amazingly I managed it! Then I just made two little black pieces of fondant to stick between the goggle and the straps. I would really stress that it is much easier to make the google once you have the rough shape and freeze the fondant for a few minutes, as the fondant is quite soft and the goggle will just collapse into itself if you don’t harden it up a bit first.
The last bits are actually quite simple. Make two yellow arms (just sausage shaped pieces of fondant) and stick them to the side of the Minion, then make little black hands, just ball up a piece of black fondant and make two little snips so you have 3 fingers. Stick the hands on the end of the arms, above his pockets, and then use a little black fondant to give the gloves an edge.
Make some little black spiky pieces of fondant for his hair and stick them on the top.
And finally make a mouth, I used a white semi circular piece of fondant and painted the teeth and tongue shapes in with food colouring, but the cake would look fab with just a marked in mouth that you could easily do with a knife.
You could now basically leave the cake as it is! It will look fab!
But I decided to add a few extras. I wanted a little more texture to his dungarees, so I used a some watered down black food colouring to paint in some texture on the dungarees and I finally added some black shoes and little blue squares for his legs. Also on the front pocket of the dungarees I attempted to make a G out of some black fondant.
Lastly I made some grass and flowers for the cake board to make it look a bit fancier!
The whole thing from start to finish, including making the 3 chocolate cakes, took me 4 1/2 hours.
So there you have it, a novice cake decorator can definitely make a themed cake with a lot of patience and time! My cake is not perfect at all, but it is certainly good enough for a 4 year olds party, he is thrilled with it!
The most important things I learned from using fondant was to make sure it is well kneaded before you roll it out and only to use a tiny amount of water to stick pieces together. I actually used a little too much water when sticking an arm on and it kept sliding off, I had to dry it with paper towel and wait till it was just slightly tacky before it would stick.
Now your cake is ready and good to go you will actually face one of your trickiest challenges, how to keep it untouched by kiddies hands until it has to be served!!! At home we actually managed this quite well, my son was son was mega thrilled with the cake that he just wanted to stare at it and couldn’t wait to show all his friends at his party. But we did have a problem before the party started! I have decided to write about this so that if anyone else faces such a nightmare you can maybe have some idea of how to fix it.
We had a couple of guests turn up to the party an hour early (yes AN HOUR EARLY) (I KNOW!!!), which meant that there were kids running about while I was still setting up and the mums didn’t quite supervise them properly. One of the little darlings (typed through gritted teeth lol) decided to shove his hand straight into the cake, breaking the goggle, pushing half the front pocket into the Minions tummy, and leaving 4 large finger holes in him. I’ll be honest, I wanted to cry. But I didn’t, I put on my big mamma pants and tried to fix the cake. Kids will be kids right? Don’t know why I didn’t expect a hand in the cake!
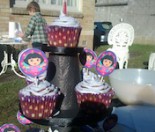
So I hollowed out the wee blue legs I had made and then pushed the fondant into the finger holes, then used a little blue food colouring to blend the top. I took the pocket off and tried to reshape it as best as I could before sticking it back on and using a cocktail stick to redo the seam marks. The pieces of the google were all quite large so I managed to sort of stick them back together with a tiny bit of water, although it did take about ten minutes. After that the Minion looked almost back to normal thank goodness! And once it was on the table with all the food you couldn’t notice it had been fixed. The last picture shows the party table of food with the fixed Minion, not bad huh?
So there is my rather long blog on how to make a themed Minion cake! I hope you other mums will find this helpful and have the confidence to try some something like this. Please let me know if you have any questions, you can contact me on twitter, Gilly_nash or leave a comment on the blog.
Be brave and give it a try, If I can do it you can do it!!!!
Thanks for reading, Gilly 😊


You are so talented and amazing Gilly, not only to make this cake, but also for writing about it in such a clear detailed way so that everyone can have the confidence to try this and succeed! A really handy tip for those out there going to try this, is to add tylose powder or gumpaste to your fondant for things like the black rim of the goggles – it makes the fondant set hard and saves the disastrous flopping and the freezing (which generally only works temporarily). You have to swiftly make the shape and put it on though… Read more »