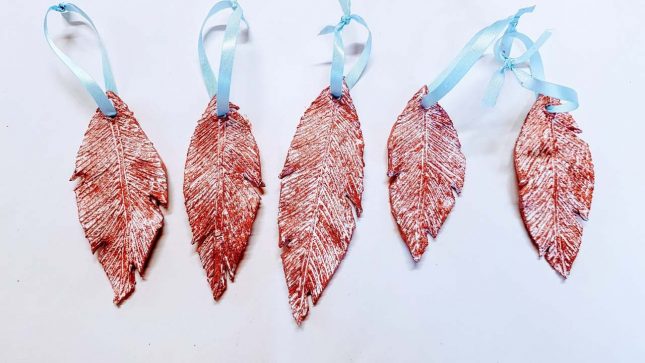
Air drying clay has to be one of my favourite materials to use with kids young and old. This Christmas I’m thinking about doing a bit of a bohemian-themed tree, so we’ve made these little air dry clay feather decorations to go on it.
Everything I have used to make these decorations can all be purchased from crafting stores like Spotlight, or any sort of emporiums you have near you.
Last year, for Christmas, I shared with our readers 3 really cute clay decorations you could make so if you have any clay left over you might want to check those out too.
Air Dry Clay Feather Decorations
You will need
Air Dry Clay (I used Jovi Clay Air Hardening White)
Resene test pot paint in Copper Fire
A rolling pin (or a bottle to roll with)
A sharp knive
A toothpick or something with a sharp point like a needle
Ribbon
Scissors
Baking paper or Tinfoil – baking paper is best though
What to do
1. Lay down a sheet of baking paper to roll your clay onto. This will stop it sticking to the bench (I only had tinfoil and it worked OK too).
2.Roll out your clay until it is about 5mm thick.
3.Using a toothpick sketch in the rough shape of a feather.
4.Once you have a simple shape cut around the shape with a sharp knife and peel away the excess clay.
5.Using your pointed object scar in two thin lines running vertically to make the centre of the feather.
6. After you have created the centre line score out from the centre, line in a diagonal direction, to give the impression of a feather.
7. Now cut out little triangles from the side of the feather. Just do 3, and place them randomly. That’s helps make your feather look more natural.
8. Use a pencil to place a hole at the top of your decoration.
9. If you would like to make them a little wavy pick them up gently and give each side a little twist. Then set aside to dry in a warm place overnight.
10. Once they are completely dry you can paint them.
11.To paint them I used a fairly dry brush so that I still had some of the white clay showing through. Make sure to paint both sides and let dry.
12. Lastly attach a piece of ribbon or string to your decorations.
I quite like mine left in a raw state like this. But you could also paint a clear-coat over the top in matt or gloss, depending on the look you like, just to give them some extra durability.
If you are in the Christmas spirit and want some more DIY Christmas craft ideas check out our eco friendly Christmas tree, our Peg craft Christmas decorations and these Whimsical Wooden Christmas Angel. Or, check out 100s more crafting ideas in our Creative arts and crafts section.


