I don’t know about you, but I find it really tricky to think of great gifts the kids can give their Dad. I don’t want to spend a fortune but I do want to come up with something that will be meaningful too.
Here are two ideas for gifts using paracord that might inspire you! They’re a bit complicated for kids to work through on their own, so you’ll definitely need to help. But they’re both great craft skills to learn.
Paracord Leatherman or Pocketknife Pouch
This is an awesome present for Dads, especially those who like to hunt or tramp. You can use the same techniques using paracord for other items – for example, making a phone case etc. This would be suited to an older child as it can be quite tricky at times.
Note: In this tutorial when I made it, I used 550 Paracord which is a very high quality ‘rope’ (if you have seen Bear Grylls Man vs Wild he uses it :)) meaning it will last an exceptionally long time. It’s very hard wearing and in any survival situation (say Dad is out hunting etc), can be used for numerous tasks such as attaching equipment to harnesses, as dummy cords to avoid losing small or important items, tying rucksacks to vehicle racks, securing camouflage nets to trees or vehicles, and so forth. So it is your call whether you use it, or just another type of cord that is approx. 1/8th inch in diameter that can be purchased from Spotlight, or your local hardware store.
 Materials:
1. Approximately 30 feet (roughly 9.14 metres) of 550 Paracord, any colour you like.
2. Scissors to cut the cord
3. Lighter to seal the ends of the cord
4. A hair pin or similar to help with the weaving process
5. A scrap piece of wood at least 18 inches long and 3-4 inches wide
6. Some drawing pins or something similar to hold the cord in place as you weave.
Method:

Using the scrap piece of wood draw 2 lines 12 inches apart. This is your length marker.
Cut a piece of cord 10 feet in length and pin it to the wood at one line, then down to the other line and back again until you have used all the cord.
You should have a total of 10 x 12 inch horizontal strands pinned at each end.
When you pin the cord in place, ensure there is no slack but do not pull the cord too tight as it will make it difficult to weave.
You will not be using the outermost strand on either side so you can unpin the ends and leave them loose leaving you with 8 strands.
You need to cut another length of cord about 12 feet in length. You then need to remove the white internal strands from this cord to make it possible to weave.
For best results you should use something on the end of the cord to make it easier to pass through the weave. In the picture, I have used a hair clip as a needle however anything relatively thin and rigid can be used so long as you can attach it to the end of your cord.

Pass the gutted length of cord over and under the horizontal strands pinned to your wood. Once all the way through ensure the cord is not twisted (removing the internal strands means it should now lie flat)
Simply repeat the process the other way, under over under over and under.
You should be able to tighten up the vertical weave quite easily, if it is difficult to tighten then the horizontal strands pinned to the board may be too tight.
Simply continue weaving your vertical strands till the entire length is completed. It can be a little tricky at the very end as you will have to remove the weave from your wood to get the last few rows done but patience is the key.
Once you have completed your weave use your lighter to melt the ends of the cord in place.
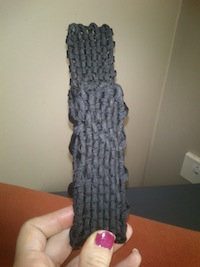
You should now have a woven length of material 12′ long and about 1.5″-2″ wide. On one end you should have your two 12″ loose strands.
 Wrap the length of woven material around your leatherman to form the shape of your pouch. The two loose strands should be at the front of the pouch (not on the piece which will form the flap)
Keeping your leatherman in place begin to lace the loose strand down the side of the pouch . You can lace it up however you like but remember not to lace it up too tightly as you will find it difficult to take out or put in your leatherman if it’s too tight.
Once you’ve laced up both sides you can trim the ends off and use your lighter to melt them in place. As before, if you don’t feel confident melting them in place, you can sew them in place with a bit of black thread.
3. Take the last length of cord which should be about 3 feet in length and remove the internal strands.
Thread this cord into and through the weave on your pouch creating two strands for the belt loop.
Finally once you have finished your belt loops again, cut and melt the cord in place using your lighter and your paracord leatherman pouch is complete!
You could finish it off if you wish by buying a little velcro or a snap button to keep the flap closed however after wearing my pouch for a few days the flap stayed closed on its own.
Making a paracord bracelet
This is a simpler gift idea that can also be changed to make things like a dog collar, or belt etc. This will be a bit easier for younger children, but an adult will still need to help.
 Materials:
1. Paracord (length is dependent on what you want to make but for my partner’s wrist I used 9 feet (Work on 1 foot of cord for every 1 inch of knotted bracelet length so if his wrist is 8 inches you’ll need 8 feet of cord etc)
2. A tape measure or ruler,
3. Scissors,
4. Side release buckle (i used a second hand one we had lying around off a dog collar haha – so you want it smallish 5/8 inch is perfect, Spot light also sell them)
5. A lighter
Method:

2. Hold the ends of the cord together and find the center of the loop. Take the center of the cord and pull it through one end of the buckle (either side of the buckle, it doesn’t matter). Now pull the cord ends through the loop until it’s tightened up and attached to the buckle.


5. Keep tying the knots until you have filled the space between the buckle ends. The knots should be uniform from one end to the other. Tie each knot with the same tension to keep the them all the same size.


