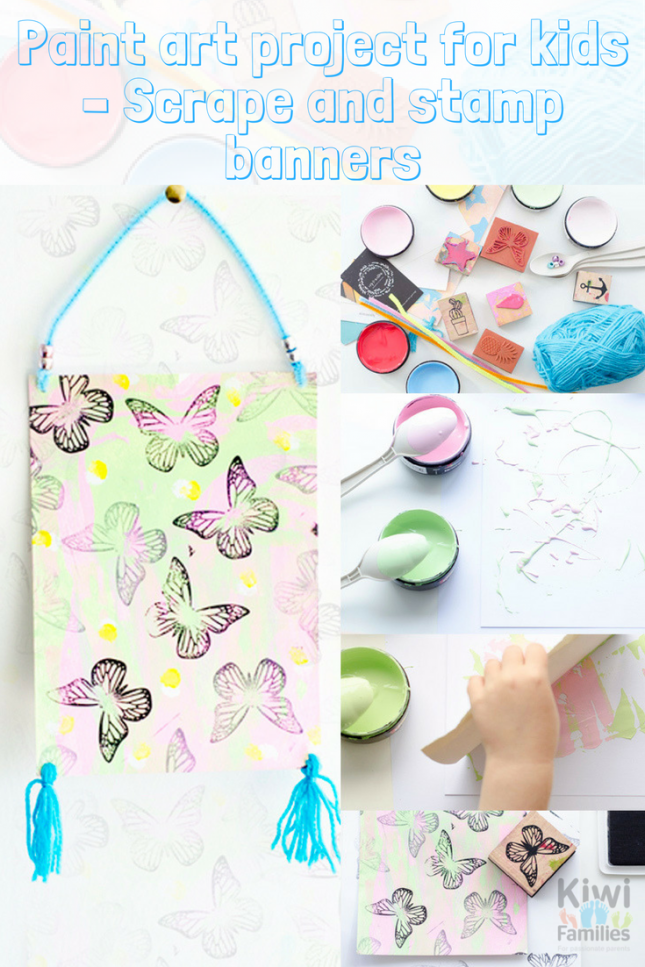
I love this paint art project for kids, as it’s suitable for all ages. I did this art project with a class of 5 and 6 year olds the other day, and it was a hit. All the kids were so enthusiastic to get started and kept telling me how excited they were to make their own banners.
This paint art project allows kids to explore paint using a number of different techniques. Instead of using paintbrushes you use spoons to pour the paint on, cards to scrape the colours around the page, and stamps for all details.
There’s something so magical watching your little ones use paint in different ways. They go into their own world of exploration, finding excitement in the way the paint moves and how the colours mix together.
Now I won’t lie to you, this paint art project can get fairly messy! So it pays to be prepared before you start; especially if you’re working with young children. For older kids just make sure they have enough newspaper down to catch any overflow, and they wear old clothes.
Here are some handy tips before getting started.
1. Before starting this project make sure you have a clear space, with either newspaper or plastic down to protect the surface.
2. I find having some handy towels, or wet wipes, close by comes in very handy.
3. Also, a larger piece of paper under the one you’re working on is useful in case there’s any overflow of paint. That way you can just remove the underneath piece and discard it, and still have a clean area to keep working on.
Paint art project for kids – Scrape and stamp banners
Materials you will need
Acrylic Paints of your choice (we used Resene test pots, which I like because they’re run well, and you can spoon them out easily)
A5 thick paper (I used a watercolour paper. Using thick paper is important so the paint doesn’t rip it)
Plastic spoons
Old plastic cards or business/appointment cards are good for scraping with
Home-made stamps or bought stamps
Pipe cleaners
Hole punch, but if you don’t have a hole punch a screw works just as well
Wool
Beads (optional)
Ink pad
What to do
Choose two colours and spoon them onto your page. We used Resene Tutti Frutti (green) and Ballerina (pink). Less is more when you’re spooning it on!
You can always add more if you need to. Make sure when you’re spooning it on it’s spread around the page.
Next grab your scraper and move the paint around the page until the whole page is covered. This can become very messy so have those handy towels ready.
kids really love this bit and sometimes they get carried away and the paint just turns a little muddy in colour. So to avoid this remind them to scrape right to the edge of the page and then either wipe the card before scraping again, or change cards to get a clean wipe.
At end of the day if the painting turns out a little muddy, but your kids just love exploring what the paint is doing, just go with it. It really is all about your own child’s freedom to express.
You will need to let this layer dry. But it shouldn’t take too long as the paint ends up being quite thin. An hour should be long enough.
When the paint is dry you can start stamping. If you haven’t got any stamps it’s very easy to make your own. Check out our stamp making page here. Or you could stamp it with objects found around the house like toilet rolls, rubbers, pegs, coins, pompoms, or anything with an interesting texture.
You can use an ink pad or just paint acrylic paint thinly onto your stamp and stamp away. Stamp over some of the edges of the painting as this looks really effective. In our one, we used a butterfly stamp with black ink, and dipped a pompom into Resene Shooting Star (a yellow) and Cotton Wool (a white).
Once all the paint or ink is dry, punch four holes, one in each corner. If you don’t have a hole punch you can use a screw like in the picture below. Just place a sponge cloth or some foam under the paper.
At the top thread a pipe cleaner through one hole. Twist the end around itself to fix it, and add a few beads to hold the twist. Add a couple more beads, then thread the other end through the other hole. Twist the end around itself to fix, and pull the beads down over this twist to hold it.
Lastly, to make the tassels you will need to cut at least 6 pieces of wool for each side, around 8cm long.
Thread each one though the hole and then tie an extra piece of string around all the wool pieces, as shown in the picture below.
Hang your scrape and stamp banners on your child’s wall and enjoy. If you loved creating this paint art project check out some of our other paint and craft projects.


