Birthdays can be expensive and overwhelming but they don’t have to be! Here are some simple ways to ‘make your own’ birthday party.
Party food can cost you a lot of money but it can be great fun to make your own. This recipe for rainbow cupcakes makes gorgeous, colourful cupcakes and you can play around with the colours to suit your party theme.
Rainbow cupcakes with butter cream icing
From the Hansells Website www.hansells.co.nz
Serves: 12
Ingredients:
1 cup all-purpose flour
1 cup butter, melted
1 cup sugar
5 eggs
2 tbsp condensed milk
1 tsp baking powder
1 tsp pure vanilla essence
3-4 drops food colouring, each for red, green and yellow
Method:
BEAT butter and sugar till well incorporated. Add in eggs one at a time while continuing to beat mixture lightly.
FOLD in flour a little at a time, on a low mixing speed till the mixture is well blended. Add in baking powder, condensed milk and vanilla essence.
DIVIDE the batter into three separate bowls of equal measure. Add a different food colouring to each bowl.
LAYER the cake batters one colour at a time on greased muffin cups. Bake in a 350 degree preheated oven for 20-25 mins or till done.
Butter Cream icing
8 Tblsp Butter
3C Icing Sugar
3-5 Tblsp milk
1 tsp Vanilla Essence
1 – Put butter in large mixing bowl and blend with mixer on low speed until light and fluffy (approx. 30 sec).
2- Add icing sugar, 3 Tblsp Milk and Vanilla Essence.
3- Blend on low speed for approximately 1 minute then increase to medium speed for another minute until thick and fluffy
You can add 1-2 Tbslp more of milk if the mixture is too thick.
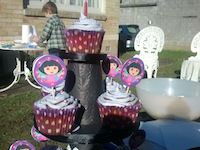
I love making beautiful decorations for my children’s parties and this cupcake stand is a good example of a decoration that can be make relatively inexpensively.
Making your own cupcake stand
Materials:
Thick Cardboard (or an unused box)
3 Plates or similar of different sizing to draw around (i used a dinner plate, bread and butter plate and a mug)
Pen
Scissors
Hot Glue Gun
Glue Stick
Ribbon
Decorative Paper
Plastic Cups or polystyrene cones (If using polystyrene, you need to use a speciality glue that wont dissolve the polystyrene)
Tooth Picks
Method:
1. Use your plates or similar and a pen to draw 3 pairs of circles (so 2 circles of each size)
2. Use a hot glue gun to glue the same sized circles together – this will make studier layers for your cupcake stand
3. Measure out the length of ribbon you will need by wrapping it around the circumference of each pair of circles, cut and use hot glue gun again to glue in place (Try get ribbon that is at least the same thickness of the two circles that have been glued together so as to cover up all cardboard edges.)
4. Then use your pairs of circles to draw out the exact shape for the decorative paper – you will only need to cover the top of each pair). Paste the decorative paper to the top of the circle with a glue stick
5. You should now have 3 layers for your stand all decorated and ready to be assembled with the layer separators
6. For the layer separators I used polystyrene cones ($6.99 for a pair from Spotlight) but you can also use plastic cups if you wish. So decorate your layer separators as you wish – I used decorative paper for a classic look.
7. You can either glue each end of the layer separators to the circles or you can use tooth picks if you wish to disassemble and re-use later.
All done. A lot more personal and very inexpensive!!
Other homemade options:
-Cupcake picks: My daughter’s 2nd birthday party theme was Dora and Elmo and these can be very expensive if you want to get everything with this theme so I decided to make some cupcake picks to tie the theme together. Simply copy and paste some pictures you like of your character onto a Word document and print onto photo paper. Cut out and paste two together, with a tooth pick in the middle. Push them into each cupcake.
-Popcorn boxes: I tried to include some relatively healthy options and know that popcorn (without butter) is a great choice and kids love it. I simply search popcorn box template on Google, found the one I liked and printed it out onto photo paper. Fold on the fold lines, glue stick together and there you have it 🙂
– Rather than buy fancy cups, just get some cheap paper cups and paste some appropriate pictures onto the cup. My daughter’s third birthday party had a ‘Minnie Mouse’ theme and we pasted black paper ears onto red cups.


