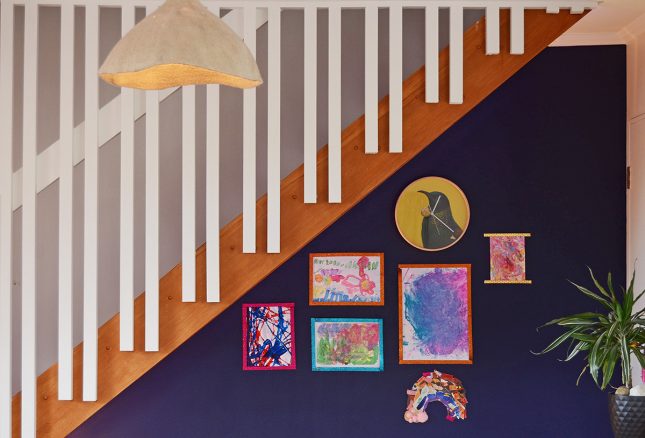
Ever since we renovated our 80s bungalow, we’ve wondered what to do with the wasted floor space under our stairs. Finally, we decided to create an under the stairs study nook for our 2 kids. This is part 1 of our under stairs kid’s study nook project.
Under stairs kid’s study nook part 1 – Magnetic art display wall
We imagined a fun, yet functional, space where the kids can indulge in creative play. That’s when we struck on the idea of a magnetic art display wall!
We’re a big arts and crafts family. We love creating ‘invitations to play’ spaces for our kids to explore their creative thinking. And we really encourage their artistic output. But, one of my pet peeves is random kid’s art stuck all over the fridge!
Don’t get me wrong, I love to see the creative output. And I even love adorning our walls with our kid’s wonderful creations. But I just don’t like messy magnets all over the fridge, and paper hanging sideways, with artwork constantly falling on the kitchen floor!
So when we decided to turn our space under the stairs into a study nook, it was important to think about how the kid’s artwork would be displayed there. Our simple, but effective, solution uses magnetic paint and washi tape-wrapped magnetic roll tape (bit of a tongue twister that!).

Our colour inspiration
Our colour inspiration came from the cool Resenecolour Instagram feed. This is a great resource for renovating. The mood boards, and colour inspiration are matched to artworks, and home furnishings and show lots of really bold colour choices.
The actual wall colour that we landed on was a deep blue with a strong purple tone. We thought this would add some real depth to the wall under the stairs, while also providing a great backdrop for our kid’s art.
We actually took this Instagram image into the Resene Colourshop to find out more:
While we were there the awesome staff member told us to grab a couple of test pots. She said that sometimes digital images are slightly different than the actual colours, especially when viewing on a phone like we were. So we took a couple of test pots home, the colour mentioned on Instagram, and another one a couple of shades brighter.
It turned out the colour we liked more, Resene Bullitt, was the slightly brighter one! So definitely grab a couple of test pots and try out the colours at home, as they could look quite different (which, by the way, is the reason the outside of our house was painted pink by mistake… don’t ask!).
Magnetic wall paint

Magnetic wall paint is such a cool idea! The paint is full of iron oxides that attract magnets, and you can paint it under any acrylic topcoat colour. You can then use magnets to display your artwork on the wall.
But, as we learnt, it comes with a few caveats.
Magnetic strength
The ‘attraction’ of the magnetic paint wasn’t as strong as we anticipated. We painted 2 coats to begin with, but the magnetic tape struggled to hold up the artwork. So we applied a third coat, which was definitely better. But heavy card still needs all 4 sides of magnetic tape on it to stay up.
I think even 4 or 5 coats of magnetic paint wouldn’t be overkill. And stronger magnets would be better too. But if you’re using magnetic roll tape like we did, you’ll be limited to how strong it is.
Finished surface
A real quirk with magnetic paint is that you can’t sand it. This makes getting a great finish a little tricky. I’m a bit of a perfectionist when it comes to painting. I like a really thick, but really smooth paint finish.
We used a super-smooth roller sleeve, but after 3 coats and no sanding there was a definite ‘orange-peel’ effect on the finish. From just a few metres back, you can’t really tell at all. But up close it’s quite visible. Just something to keep in mind.

Washi tape-wrapped magnetic roll tape
Our inspiration for wrapping the magnetic roll tape in washi tape was a bit of a happy accident. Originally we were planning on upcycling old picture frames, sticking magnets to the back, and using these to display our kid’s artwork.
Although this would’ve looked really cool, it just isn’t possible using magnetic roll tape. It’s just not strong enough. High-strength industrial magnets might hold a very light picture frame. But the only high-strength magnets we could find were really big and chunky.
So we turned this problem into a solution, by using the actual magnetic tape as the frames. Here’s how to do it:
1. First, measure the 4 sides of your artwork. We cut out strips to fit A3, A4 and A5 sized paper, to suit a range of different sized pictures. Just note, you want to end up with the magnetic tape half on-half off the artwork you’re displaying. This ensures half the magnetic tape is touching the wall directly. We found this was the only way to hold up heavier pictures.
2. Now stick the magnetic roll tape down to something metallic (we used a baking tray), this helps to keep it flat. Cut the magnetic tape into 4 strips to fit the 4 sides of your artwork.
3. With the magnetic tape still stuck to the tray, roll out the washi tape, and stick it to the front of the magnetic tape.
That’s it. You now have 4 ‘frames’ to place around the edges of the artworks you want to display.
We used really vibrant glitter washi tape for our frames, as we wanted to keep it fun and fresh for the kids.
LED strip lighting
We really needed to get some light into the space under the stairs. It can be quite dark under there in the evenings, even with the lounge lights on. It’s definitely too dark for working under. We also wanted to redirect the lighting onto the wall, and at the children’s artwork, to really make the whole space ‘pop’.
LED strip lighting was the perfect answer!
We ran the strip lighting down the inside of the staircase stringer, facing back at the wall. We used LED strip lights with the self-adhesive backing tape, which made the job really easy. The final effect is great, with lots of working light, light on the artwork, and interesting shadow effects thrown around the staircase.
In part 2 of our under stairs kid’s study nook project, we upcycle an old school desk and bookshelf, providing a huge splash of colour. And we add a surprising paint effect to encourage creativity.


