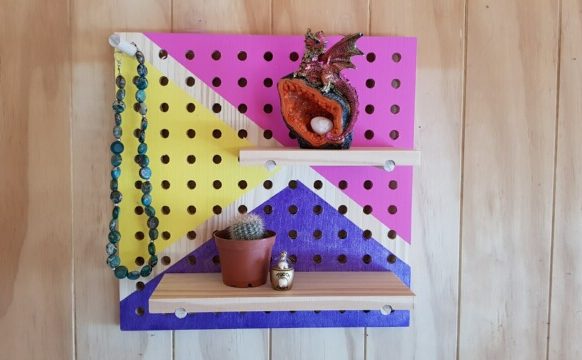
I have been looking around for an option for my daughter’s necklaces and brackets, which often just get left lying around on her dresser, or fallen on the floor. Here’s the solution I came up with using a DIY pegboard, to create a peg board shelf.
After seeing the DIY pegboards at Spotlight I decided we could give it a little paint job makeover, and use it for her room. You can also get larger pegboards from K-Mart too. I’m hoping this will help clear some of the cutter off my daughter’s dresser, but we will see!
This is a great little activity for kids 8 and up, especially over the upcoming school holidays. It is fairly simple and they can pretty much do the painting themselves. And they can easily change up the design and colours to make it their own.
How to Make a Peg Board Shelf
You will need:
A Peg Board – I got ours from spotlight but you can get them from other places too.
Paint brushes
Resene paints in Wild Thing, Smitten and Funtasia
Masking Tape
What to do:
1. Grab your masking tape and tape the design you would like to paint on. If you would like it to look like ours, tape a diagonal along the top third of the board, and then a second piece of tape diagonally underneath. I place mine just off centre.
2. Once you have your design all masked up, decide which colours you would like to paint your board.
3. My daughter helped choose her colours for her one, and I painted the top triangle with Resene Smitten.
4. Then I painted the next triangle in Resene Wild Thing and the last shape in Resene Funtasia. If you really want the colours to pop, you should give it three good coats.
5. When all the paint is dry you can carefully peel off all the tape.
6. Lastly hammer in the pegs and decide where you want your shelves placed, and hang on the wall.
If you have enjoyed this article be sure to check out the Air Dry Clay Hand Dish and our DIY Bottle Necklace; both great school holiday projects. And for 100s more art ideas check out our School age: Creative arts and crafts section.


