I discovered story stones a little while back and decided it was time to share them with the Kiwi Families community. These story stones are inexpensive to make and can be used for a whole range of activities.
Story stones are basically a set of stones that you and your children create, that are then used to either retell a classic children’s story, or you can use them to make up your own stories.
The really cool part about this activity is that it requires you to get out of the house, down to the beach or river (or local quarry 🙂 ) to collect the stones. Then you and your child can get creative painting and decorating your rocks. And then you get to use them over and over, to tell the story. It’s like 3 activities in 1!
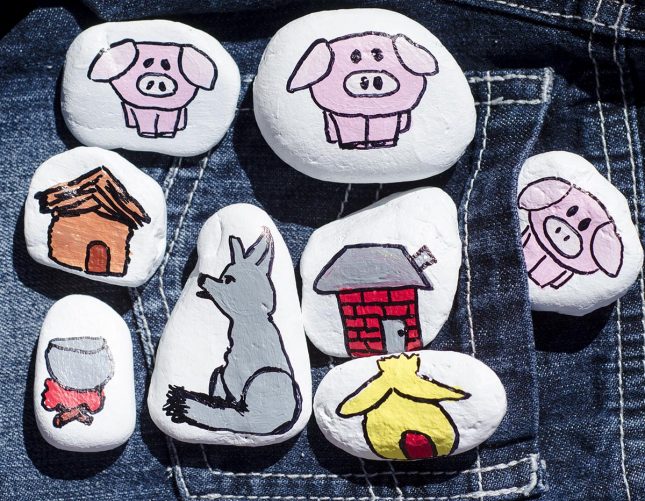
I decided to make our first story stone set based around the story of the 3 little pigs. My little miss 3 is really into the 3 little pigs at the moment, so this was a great one to start with. She’s slowly learning to tell the story herself, and the story stones will help her to remember each scene. As the stones are so tactile, it especially helps kinesthetic learners (which is most of us). It’s such a cool learning tool!
How to make and use story stones
Materials you will need
A set of wide and flat stones
Acrylic paint (we used a selection of Resene test pots from their kid’s range, the colours included: Wild West, Ballerina, Pretty in Pink, Candy Floss, Cotton Wool, Regent Grey and Shooting Star)
A black vivid/sharpie
Paint brushes, one think and one thin
What to do
Go to the beach or river and collect a set of flat stones to paint on. You’ll need at least one stone per character, per scene, or per action of the story.
Paint all the stones white, we used Cotton Wool White from Resene. Apply 2 coats for the best finish.
Paint the characters from your story. A great idea is to jump online and search for ‘how to draw/paint …’ the character you want to paint. For most characters you can find outlines, printables and even tutorials online.
We did the 3 little pigs, and I used 2 different shades of pink for the pigs and a grey for the wolf. For this story you can paint one pig on each stone, a wolf on one, and each of the 3 houses on seperate stones, finally I included the pot on the last stone.
Let the painted images on the stones dry, then go around the outline with a black vivid/sharpie for definition.
They’re now ready to use.
Tips on how to use the story stones
Read the three little pigs with your little one and then replay the story together using the stones.
Use the stones as you read the book with your little one. This way you can encourage them to take on one of the characters and repeat the story after you with the stone character.
Then just tell the story using the stones. Let your child use the stones and tell parts of the story too. Eventually, they’ll be able to retell the story, perhaps with your help initially, and then entirely on their own.
On a sunny day take the stones outside with some chalk and draw in the 3 little pigs’ village. Then place the stones into the story.
Our kids are learning and developing
Communication – Story telling is a great way to build your child’s communication skills in a fun and supportive environment. This activity lends itself to your children building on their vocabulary and developing their imagination.
Physical skills – This activity is great to help children develop their fine motor skills. They’re doing this when they’re using a paint brush, cutting and sticking objects in place. Fine motor skills are important to practise because it helps small children perform everyday skills like cutting, threading beads, self care tasks like zipping and buttoning and doing puzzles and writing.
If you and your kids love painting on stones check out our Painted rocks craze article.



that’s so much hinteresting and fun to play using the stones!
Thanks! Yea, it’s such a simple idea, and a really fun learning/play tool for kids. Have fun rock painting!
what a great idea!