This year, I made it my mission to start creating a set of quality dress up’s for my kids that don’t cost the earth. We have a special box full of them in the lounge under our bench seat my husband made. I like to add something new every few weeks and take other things out that aren’t being used, or have become overused. If the dress-up I take out is in good enough condition still, I store it away and place it back in the box again later down the track.
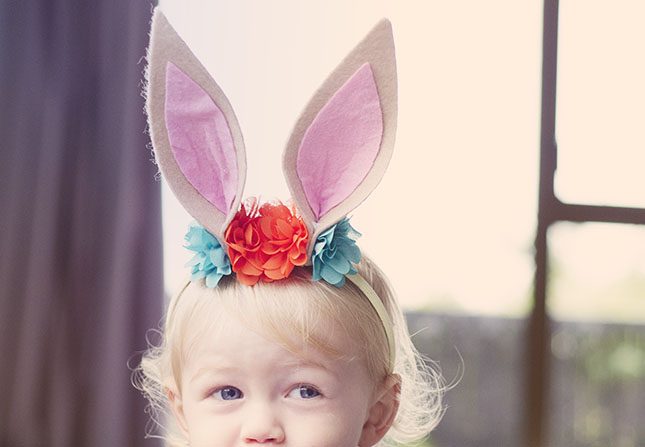
And lets face it what kids don’t love playing make believe and dressing up! Imaginative games are really great for your child’s development. When kids play imaginative games they’re developing communication skills, social skills and creative problem-solving skills. So for Easter I’m making bunny ears that are super cute and really pretty simple to make.
Little children would find these a bit fiddly to make but older children from about aged 7 upwards should be able to give them a go with some guidance.
I love the head band concept. If your child’s anything like mine, she’d rather put on a head band for dress up than masks and wigs. She finds those too scratchy on her skin to wear for more than a few minutes.
How to make Bunny Ears
Materials you will need
One piece of grey or brown thick felt for the outer ear (this can easily be sourced from Spotlight or any craft emporium)
One piece of thin pink felt for the inner ear
A plain head band (I got my from a place called Uncle Bills it was about $2 for a set of five)
Small material flowers (optional)
Glue gun and glue sticks
What to do
Draw the outline on your felt for the outer and inner ear. You can either use the printable provided or just free hand them.
Cut out the bunny ears.
Using a hot glue gun, glue the inner ear onto the outer ear, leaving roughly about 3cm from the bottom.
At the bottom of the ear make two cuts that are about 1cm apart and roughly 2cm high. These cut will help with attaching the ears to the headband. Glue across the top of the cut and pinch your felt together and hold in place until dry. This shouldn’t take too long if you are using a hot glue gun.
Once the glue is dry it’s time to attach the ears to the headband. You may want to play around with the placement of the ears before you glue them on (I found if the ears were too close they looked more like a deer!)
To glue the ears on fold the outer wings out to the side, glue the central tab and wrap it right around the headband. Hold it in place until dry.
Once the central tab is dry it may still feel a little loose, but don’t worry about that, because this next step makes them nice and firm.
Using a small amount of glue run a line of it along one of the side tabs and wrap it around the front and up, and secure it at the back. Repeat this step for the other tab.
Now just repeat the above steps for the other ear.
If you want to add some embellishments you can simply hot glue gun them on. I decorated ours with bright flowers, which gave the ears a really festive Easter vibe!
I can’t wait to see your own Easter bunny ear creations. Remember to hashtag us at #kiwifamilies over on instagram.


