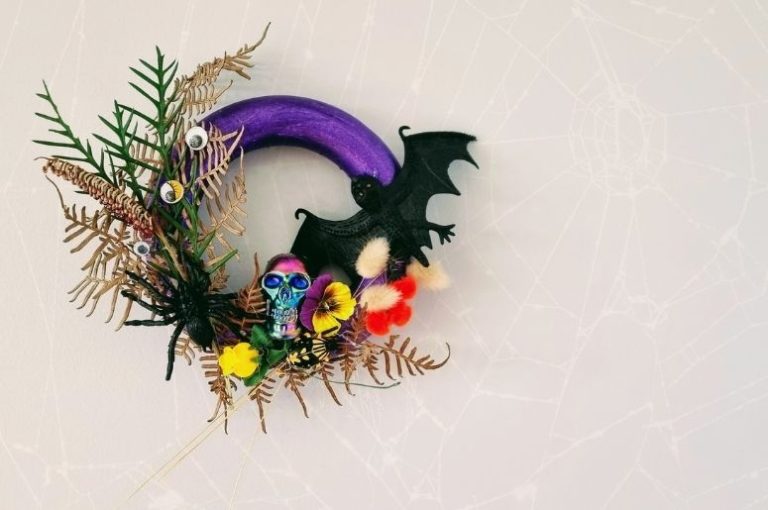
I think I’ve fallen in love with wreath-making! After making this I realised they are really, really easy to make and the materials you can use are endless.
It’s alway fun for the kids to have a reason to dress up the house in a unusual way, and these wreaths are surprisingly attractive to look at. They’re quirky and cute, and they’d make great door handle decorations for your kids room. And, although I made this for Halloween, you could make different versions for other events too.
For the flora on this halloween wreath I went for a little nature walk and picked some dried fern ends, and another plant that I don’t really know the name of, but had a fern like leaf and a red flower. I chose this one because I thought it would dry well on the wreath, as well as look a little bit ghoulish!
You might have flowers around you that dry well, but if not just use a few fake flowers, that’s what I did and it still looks great.
Have fun with the supplies you find. You can roughly follow what I have done, or completely free style it, and make it your own. When you’ve finished, share a picture, as we love seeing what you are making.
How to make a Halloween Wreath
You will need:
Polystyrene ring (you can get these from spotlight)
Resene test pot in Funtasia
Dried and fresh leaves
Flowers (dried or fake)
Toy spiders, bats and bugs
Googley eyes
Glue and glue gun
Small skull head
Orange Pompoms
Ribbon
Paint brush
What to do
1. Paint your polystyrene ring with Resene Funtasia
2. Start by gluing on your dried and fresh leaves using hot glue. This gives you the base, and basic form and structure of the wreath. Make sure to cover the bottom and one side of the wreath.
3. Decide where you want to glue your skull, spiders and bugs, etc. Then hot glue them on and around the leaves.
4. Now add in any dried flowers, and pompoms to fill in some of the gaps.
5. Glue your bat to the side of the ring and some googley eyes to your leaves.
6. Lastly glue a looped ribbon on the back for hanging on a hook, or nail, or onto a door handle.
If you enjoyed making this halloween craft be sure to check out hundreds of other art and craft ideas.


