This craft project is super flexible and loads of fun. I’ve tried it out with my own kids at home and with a bunch of 8 to 12-year-olds in school, and it’s a hit every time. If you’re on the lookout for a cool Matariki activity, you’ve come to the right place!
I used this project to introduce my students and my own kids to the awesome stars in the Matariki constellation. At school, we got together and brainstormed meanings, different colours, and symbols that could represent each star. It was a blast! Then, the kids teamed up in groups of 2 or 3 to create their own wall hanging, each representing one of the stars in the Matariki constellation.
By the way, there are nine stars, and I’ll give you a quick rundown of their names and what they mean in just a bit.
The names of the Matariki stars in Māori culture are associated with various meanings and significance. Here’s a brief overview of the meanings behind the names of the nine Matariki stars: For more information about Matariki check out our celebrating Marariki page or have a look at this educational resource.
Matariki: This is the central star and is often considered the mother star. It represents reflection, hope, and the gathering of people.
Tupuānuku: Also known as Maia, this star is associated with food that grows in the ground, such as root vegetables and fruits. It symbolises the sustenance of the land.
Tupuārangi: This star is connected to food that grows in trees, like fruits and berries. It represents growth and abundance.
Waipunarangi: Also known as Electra, this star is associated with rain, mist, and all forms of water. It symbolizes the weather and the many forms of water that sustain life.
Waitī: Known as Atlas, this star is connected to freshwater bodies, such as lakes, rivers, and streams. It represents the purity and vitality of water.
Waitā: This star is associated with the ocean and the sea. It symbolises the abundance of seafood and the vastness of the oceans.
Ururangi: This star is linked to the winds and the elements. It represents the various forces of nature that influence the land.
Hiwa-i-te-rangi: This star represents the wishes, hopes, and aspirations for the future. It is a time to make wishes and set intentions for the year ahead.
Pōhutukawa: This star represents those who have passed away. It is a time to remember and honour ancestors and loved ones who have gone before.
These meanings can vary slightly among different Māori iwi (tribes) and regions, but they generally capture the essence of what each star represents in Māori culture during the celebration of Matariki. For more information check out
And here’s the best part: This craft is perfect for those rainy days when you’re looking for something cool to do with kids of all ages. You can dive into exploring patterns and colours, or you can let your imagination run wild and see what awesome creations the kids come up with. Let’s get started!
You will need
Iceblock sticks (all craft stores now sell these in small or large bags)
Wool
Tape (or glue, or a hotglue gun)
Paint (we used Resene testpots in )
Decorative items like beads, small shells, etc (optional)
What to do
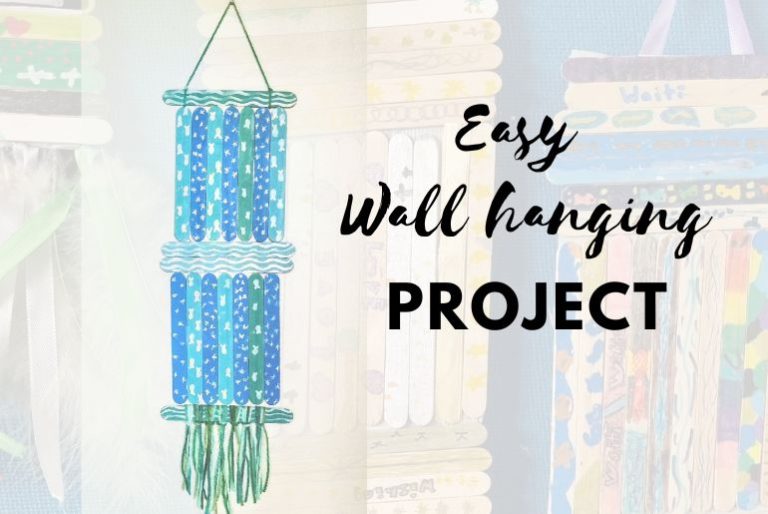
1. Start by gathering 18 large ice block sticks. Ensure they are clean.
2. Get creative by painting them. Use acrylic paint and brushes to add colourful designs, patterns, or messages to the sticks.
3. Allow the paint to dry completely before moving on to the next step.
5. Take 7 of the sticks and lay them side by side vertically. Add a horizontal stick at the top and two in the middle.
6. Take the other 7 sticks and place them vertically at the bottom of the horizontal sticks. You will add one more horizontal stick after you add some wool to it.
7. Turn your design over and secure the sticks using masking tape (you can also use hot glue, but tape is easier for little hands).
9. On the last ice block stick, add some wool tassels by knotting the wool around the stick.
If you’d like to embellish your wall hanging, you can glue on small decorative items like beads, feathers, or small shells. Place them on the sticks in a way that enhances your design.
10. Cut a piece of yarn or string to your desired length for hanging your wall art. Make a loop at one end and attach it to the top stick.
Finally find a good spot on your wall to display your creation. You can use a nail, hook, or adhesive wall strips to hang it securely.
Your ice block stick wall hanging is now complete! Feel free to get creative with your design and decoration, as this project offers plenty of room for personalisation and customisation. Enjoy your DIY art piece!


