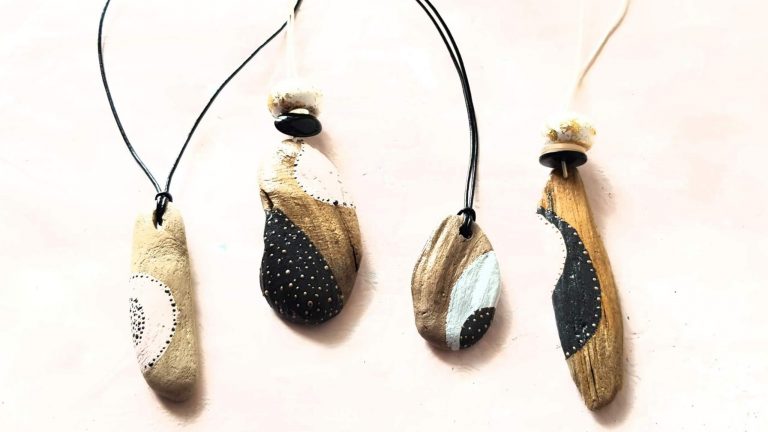
I just love using driftwood for art and craft activities. It can be used for so many different projects and has the added benefit of getting to spend an hour or two down at the beach collecting wood and enjoying the outdoors!
These driftwood necklaces are great for any age group and can be painted in a number of different ways. What I really love about them is they make great gifts to give to teachers, mothers and friends.
If you are going to make these with little ones, you will need to help them with the drilling, but don’t be afraid to let them have a go. Kids love trying out power tools and are pretty capable when shown and given guidance.
A tip for when you’re collecting the driftwood is to go for pieces that are slightly flatter, but not too skinny. If they are too skinny they have the potential to split when you drill your holes into them.
The colour pallet I chose for these necklaces was from the Resene Karen Walker (KW) series. I just really love this pallet, as it feels very natural and sophisticated. But depending on the age group you’re creating with, you might like to go for bright and bold colours too.
Driftwood Necklaces
You will need
Driftwood
Small paintbrush
Resene Test pots in KW Blanched Pink, KW Qtr Powder Blue, KW Fuscous Grey and Rose Gold
Resene Aquaclear – Waterborne urethane varnish (optional)
Buttons and beads
White and black jewellery string (mine was from spotlight)
Drill
Nail
What to do
1. Collect a selection of driftwood from the beach.
2. For the designs I went for a more organic shape rather than a geometric shape. For the first layers I used Blanched Pink, Qtr Powder Blue and Fuscous Grey on different pieces of driftwood. I worked with the shape of the wood and created ovals that wrapped around the back of the piece of driftwood. I applied 2 coats of each colour.
3. For the detailed dots I used Resene Rose Gold and Fuscous Grey. To apply the dots I used the sharp end of a nail.
4. once you have finished your design, use a small drill bit to create the hole for the jewellery string to go through. For some of the pieces I drilled a double hole.
5. If you like you can put a polyurethane over your piece to seal them and give them a light glossy effect. I used Resene Aquaclear which is a water-based varnish, and just put on one coat.
6. I threaded up my pieces in two different ways. One with beads and one without.
7. If you are not using beads, you will need to make your hole a little larger, fold the thread in half, and pass the end through the hole. Then double pull the two thread ends through this loop, and pull tight against the driftwood.
8. I used a sliding knot to finish off these necklaces, here is a really easy to follow video of how to tie them.
Be creative and see what different designs you can come up with. And if you make a mistake don’t worry too much as you can just repaint them, so be courageous and see what you come up with!
If you enjoyed making these necklaces check out our driftwood Jewellery hanger or our Boho driftwood wall hanging. And for hundreds more ideas check out our Teens: Creative arts and crafts section.


