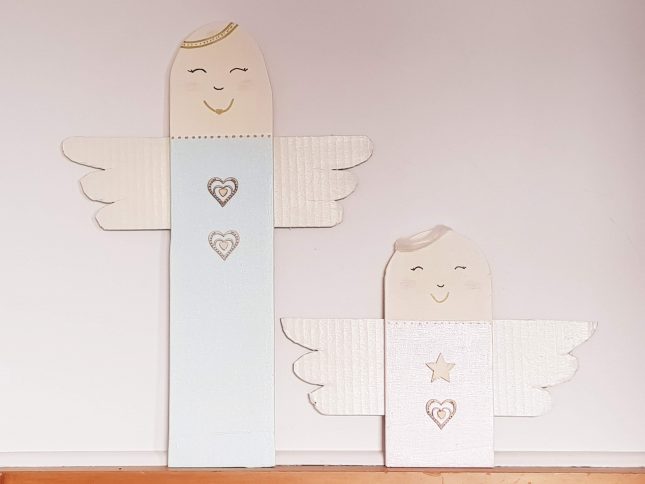
Over the past few weeks I’ve been creating and making fun Christmas decorations to make my home feel more festive. With the right tools these whimsical wooden Christmas angels are so easy to make and just look adorable!
I’m really enjoying crafting with plywood at the moment. It’s fairly easy to cut with a good quality jigsaw. And its light weight so it works well for hanging finished pieces on the wall.
And plywood is really cheap and simple to buy too. You can usually find it in 1200 x 1200mm half sheets. These fit nicely into a large car boot and are light enough to carry around. I’ve found I can easily get 3 or 4 projects from one sheet, depending on the size of them.
To make these plywood Christmas Angels I just used offcuts from some plywood I had lying around from past projects. But if you don’t have plywood, or you don’t have the tools for a plywood project, you can make these using a very stiff card.
This will work just as well, but you’ll find they just won’t last as long, and won’t quite have that sturdy wooden look to them.
One of the great benefits of making these from plywood is that you can place them outside if you paint them properly. Just make sure you paint them completely with sealer, that you paint both sides, and that you paint over the top with a UV sealer too.
Another thing you’ll see in this project is my new fav paint Resene Pearl Shimmer. I’m loving this product at the moment, but it’s hard to get a great photo that really does it justice. You paint it on right over the top of your finished colour, and it gives it this beautiful shimmer effect; perfect for Christmas projects!
DIY Whimsical Wooden Christmas Angel
You will need
Plywood
jigsaw
Stiff cardboard (if you are using this for the wings)
Resene test pots in Pearl Shimmer, Pretty in Pink, Dutch White, Reservoir
Resene Quick Dry Primer
Masking tape
Wooden decorations for sticking on
Strong craft glue
Gold pen
Black Sharpie
Pink coloured pencil
Wool (optional)
What to do
1. Draw your angel’s body design onto the plywood. Depending on how many you are making, draw them at different heights to create interest.
2. Cut the body out with the jigsaw.
3. Paint you angels with the Resene Quick Dry Primer.
4. Now give your Christmas angels 2 coats of the Dutch White. Make sure you let the paint dry fully between coats.
5. Once the paint is dry use masking tape to tape off the Angel head so you can paint the body.
6. I painted one of the angel bodies in Resene Pretty in pink and one in Reservoir, give them two coats.
7. While the paint is drying you can draw and cut out the wings from the cardboard. If you plan to have this as an outdoor decoration make sure you cut the wings out of plywood as well.
8. Give the wings 2 coats of Resene Dutch White. Making sure you let each coat dry first before applying the second.
9. Once all the paint is dry add two coats of Resene Pearl Shimmer onto the angel body and wings and let it dry.
10. When your work is dry you can attach the wings to the back of your Christmas Angel body. I just used a strong craft glue and applied glue to both parts. Let this dry before doing anymore to it.
11. Once the wings are glued on and dry, you can attach your wooden decorations. I chose a star and hearts for this project.
12. Using your gold pen draw on the mouth, and add some dots along the neck for detail.
13. to give your angel pink checks I used a pink coloured pencil and lightly shaded them in.
14. Use a black Sharpie to draw in the eyes and nose and you’re done!
You can either stand the Christmas angels up on a shelf or mantel, or hang them up using something like Command Picture Hanging Strips.
If you are in the Christmas spirit and want some more DIY Christmas craft ideas check out our eco friendly Christmas tree, our Peg craft Christmas decorations and these cute air drying clay decorations. Or, check out hundreds more crafting ideas in our Creative arts and crafts section.


