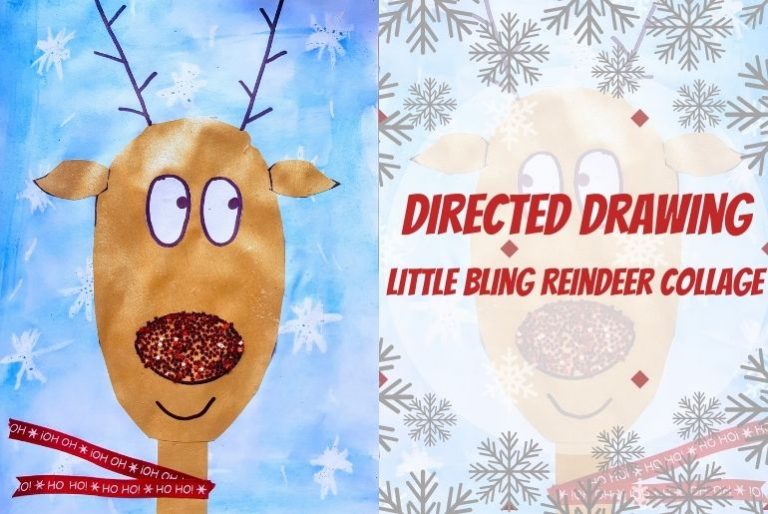
This is a great little activity that you can do with kids of just about all ages. I just took a group of 5 year olds through a directed drawing lesson and they LOVED it. Not to mention the reindeer they created looked adorable.
This little bling reindeer collage makes a great gift for teachers, family, friends and for the grandparents. Or your little ones will enjoy just seeing it hang in their own homes.
This art project uses a special effect called a resist technique because the oil in the pastel, or the wax in the crayon, resits the water colour paint. Kids love this style of painting. And you can use this technique for all sorts of different art projects.
Directed Drawing – Little Bling Reindeer Collage
You will need
3 sheet of A4 paper
Resene test pot in Rose Gold
A white pastel or crayon
Red Glitter
PVA glue or a glue stick
Kids’ water colour paints
Black permanent marker
Ribbon (optional)
Paintbrush
What to do
1. Paint the whole A4 page with Resene Rose Gold then put it aside to dry.
2. Grab your second piece of A4 paper and your white pastel. Using your pastel draw snow flakes all over the page. I’ve done one in orange so you can see it, but draw them with a white pastel.
3. Grab your water colour paints. First wet your paint brush before putting it into a colour, then pick up the paint colour using your wet brush. Once you have a nice amount of water colour on your brush, paint over the whole A4 sheet of paper in a few hues of blues and purples. You’ll start to see the snowflakes appear. Now set your background aside to dry. (I painted this one in blues, but it’s also fun to let the kids decided how they would like the background painted).
4. Your gold A4 page should be dry by now so grab it and your black permanent marker. Using your index finger place it at the bottom of the page and draw two lines down each side. (see image) This will make the neck of the reindeer. If you are doing this with little children you can draw around their finger for them.
5. Now you trace an oval shape around your hand as a guide.
6. Next cut out the neck and the head and put your painted paper to the side to use for cutting out ears later.
7. To help young children draw the nose I direct them to draw a large frown, then join it with a smile. Use your black marker to draw this on.
8. Glue inside the nose using PVA glue or a glue stick then sprinkle red glitter. I have used star glitter here, but any red glitter will do.
9. Using a blank sheet of A4 paper draw two ovals for the eyes, with the eyeballs looking cutely out to the side, and cut them out and glue them to your reindeer head.
10. Using the permanent marker draw on a smile under the nose.
11. Glue your neck and head onto the watercolour background.
12. Grab the left over gold painted paper and draw two ears. To do this with younger kids I tell them first tp draw a rainbow shape out the side of the cutout head and then draw a smile for the bottom of the ear.
13. Cut the ears out and stick them to the side of the reindeer head.
14. To draw on the antlers, draw two sticks out the top of the head, then add little lines to each side from the top to the bottom, making sure to alternate a line on each side.
15. Now cut 4 strips of ribbon about as long as your index finder. If you don’t have ribbon cut our two thin strips of paper and colour it in. Glue these strips onto the neck.
Yay you’re done! If you have enjoyed this, try another one of our directed drawings or why not try some of our other Christmas crafts., or any of our hundreds of projects in our Kids art and craft section.


