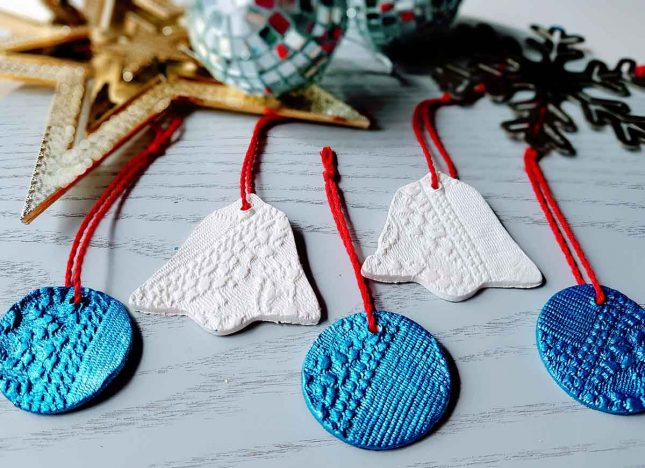
Using air drying clay to make Christmas decorations is so easy, and so much fun! It really is an activity the whole family can join in on. Here’s 3 cute Christmas decoration ideas using air dry clay.
This year the kids decided to give their Christmas decorations as gifts to their school and kindy teachers. Such a good idea! They also make lovely DIY gift tags on presents, and of course are a wonderful, and cheap way to decorate your tree.
Clay is a great medium for kids to use. It helps build their fine motor skills and strengthen the muscles in their hands. These projects also lead to lots of exploration play. Both my 5 year old and 2 year old where fully engaged for around 45 minutes.
A really lovely way to start this project is to have the kids go round the house looking for objects that could be used to print a texture onto the clay.
My daughter found leaves, bumpy card and material. Some of the objects had better results, but this was part of the fun, and if we didn’t like it we just rolled up the clay and rerolled it out.
My youngest wasn’t into creating different textures he just wanted to roll, squash and use the cookie cutters!
I did help both of them roll their clay out as it can be a bit tricky to get a nice even roll. And when the clay is a hard block it takes a fair bit of forearm power to get it started. But I always let them have a go first and then helped finish the rolling off for them.
Once you have all the shapes cut out, you need to think about how will they be used.
If you want to turn them into a Christmas bunting, then you will need to poke two holes into the top. This will allow you to weave the string in and out of the holes so the clay will sit flat. We used tooth picks but I’ve also found straws to be really effective too as they make a lovely clean circle cut.
Once you’ve let all your clay cuts dry over at least a 24 hour period, you’ll be ready to paint them.
Another good tip here is to try not to roll them too thin otherwise they get too fragile and may break. I’ve found that rolling them roughly 3-4mm thick is good for little hands.
3 Cute Christmas Decorations Using Air Dry Clay
Candy cane and bell bunting
You will need
Air Dry Clay
Christmas cookie cutters (a candy cane and a bell)
Tooth picks
String
Resene test pot paints in Pearl Shimmer, Glitterbug, and Solid Gold
Wax paper or baking paper
What to do
1. Roll out your air drying clay to about 3-4mm thick on a large piece of baking paper. This will stop the clay from sticking onto your bench top.
2. Cut out an even number of candy canes and bells. We cut about 5 of each, it just depends how long you want your finaly bunting to be.
3. Next, using your tooth pick you can create diagonal indented lines across the candy canes, as shown below. This step makes them a lot easier to paint when they are dry.
4. Also use the toothpick to pierce 2 holes at the top of each ornament. Make sure you make them a little larger as they will close a small amount as the clay dries.
5. Place them in a warm place and let them dry overnight.
6. Once they’re dry you can paint them. We used Gitterbug and Pearl Shimmer for our candy canes. You will notice the Pearl Shimmer gives the clay a lovely sparkly sheen.
6. And for the bells I used Resene Solid Gold, I only used one coat as I really like the effect of the clay showing through. But if you want a deep gold coverage give them at least 3 coats.
7. When all the paint is dry you can thread the string though each piece making sure there is an even gap between each decoration. I discovered if I taped a piece of cellotape at the end of the string it threaded much easier through the holes.
Now you can hang it on a tree, above a door or give it away as a cool, DIY gift.
Christmas Tree Ornaments
These little Christmas tree ornaments will look great on your Christmas tree. I’ve kept this idea really simple so that you can mass-produce them. You could easily make 10-20 of these to hang on your tree amongst your other ornaments, or to use as awesome gift tags for your presents.
You will need
Air Dry Clay
Christmas cookie cutters (a candy cane and a bell)
Tooth picks
String
Resene test pot paints in Pearl Shimmer, Wild Thing, Java, Crusoe, and Candy floss
Wax paper or baking paper
What to do
1. Roll out your air drying clay to about 3-4mm thick on a large piece of baking paper. This will stop to clay from sticking your your bench top.
2. Cut out a bunch of Christmas trees
3. Using the end of a pen I pressed in dots in the shape of lights hanging from the tress.
4. Lay them out to dry in a warm spot overnight.
5. Once dry you can paint the lights in. I used a selection of Resene test pot paints to colour in the indents. Once the painted lights were dry I added the Pearl Shimmer right over the top. I seriously love the effect of Resene Pearl Shimmer!
6. Add your string and they are ready to hang.
Lace print decorations
This is a seriously cool effect, and I think these would make a really lovely gift for the kid’s teachers this year.
You will need
Air Dry Clay
Christmas cookie cutters (a circle and bell)
Tooth picks
Lace, doily or a textured material
String
Resene test pot paints in Pearl Shimmer and Yeehaa
Wax paper or baking paper
What to do
1. Roll out your air drying clay to about 3-4mm thick on a large piece of baking paper. This will stop to clay from sticking your your bench top.
2. Once you have rolled it out place your material on top of the clay and lightly roll the print on to your clay.
3. Cut out a bunch of circles and bells from the pressed clay.
4. Let it dry overnight.
5. Once dry, you can paint them. I painted mine in Resene Yeehaa and my new fav Resene Pearl Shimmer.
6. Add your string and hang on the tree or use them to make cute little gift tags, or to give away as DIY gift.
I hope this article has inspired you make some of your own beautiful Christmas decorations using air dry clay. If you enjoyed this head over and check out some of our other Christmas decorations here and here. Or check out hundreds more crafting ideas in our Creative arts and crafts section.


