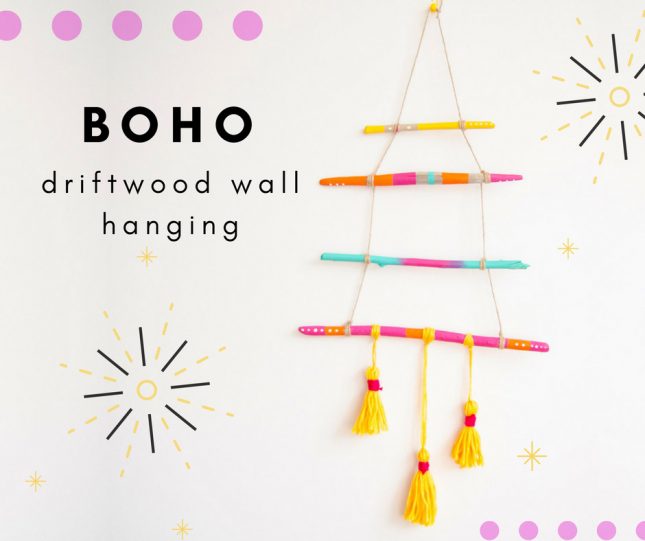
Last month I made this amazing painted driftwood mirror, that’s the perfect teen craft activity. I ended up with quite a bit of driftwood leftover from this craft, so I decided to keep going with this idea, and made this boho driftwood wall hanging too!
This is a really simple craft to do with young children. Older kids will love designing and painting their own driftwood sticks. But there is a bit of fiddly tying with string and wool involved, so it’s more suited as a craft for tweens and teens.
Like some of the other driftwood crafts I’ve created, the best part about this activity has to be getting down to the beach to collect the driftwood in the first place.
The kids and I had a wonderful time at the beach. It was one of those warm, crisp winter days. And we spent ages walking down the beach, searching amongst the flotsam and jetsam, for those perfectly weighted sticks. Time we may not have spent together otherwise.
Even when it comes to crafting, the journey and process are often more important than the finished product!
Boho drift wood wall hanging
You will need
String
Driftwood (collect an assortment of thin, different sized, sticks to use)
Resene test pot paints (I used Scrumptious, Niagara, Tangerine, Quarter Moonbeam and Bright Spark)
Yellow and pink wool
masking tape
What to do
1. Paint your driftwood sticks in a number of different ways. You can use masking tape to tape off sections, you can paint whole sticks in one colour, or contrasting colours, and you can embellish them with dots and borders.
One cool effect, I really love, is this gradient effect you can see in the picture below.
To get this effect you simply paint the ends in one colour (in this case I used Resene Niagara). Then, while your paint is still wet, add a second colour in the middle (I used Resene Scrumptious as a great contrast). Then you just start in the middle, and very lightly brush the middle colour into the end colours (pink into the blue).
2. Now leave all your driftwood sticks to dry. To speed up the drying process you can use a hairdryer. But because they are driftwood, and very porous, it soaks in the paint fairly fast so is quick to dry (important when you have impatient kids waiting around!). While you wait for the driftwood to dry, you can start on the tassels.
To make the tassels
3. Grab a small box or book and wrap your yellow wool around it about 20 times and cut off the end.
4. Next cut a piece of wool about 10cm long and wrap in under your wool and tie a simple knot at the top. Now slide the wool off the book or box.
5. Now grab your pink wool and cut a strip about 15cm long. Measure about a fingers gap from the top of the wool and start wrapping it around. Once you have wrapped it around a few times tie it off with a simple knot.
6. To trim the tassel evenly stick a piece of tape at the bottom and cut through the tape, then remove the tape and you have a tassel with lovely trimmed ends. Make 3 of these.
7. When your drift wood is dry decided how many pieces you are going to use for your hanging. I chose 4. When you’ve chosen the number, lay them out in front of you at the distance you want them to hang on the wall, and start attaching them with your string.
8. To attach the string cut 2 long lengths of equal size string. You will need one piece for each side of the driftwood hanging. Start by wrapping a couple of wraps around your bottom driftwood stick first, then tie a simple knot, before moving on to the next stick. Run out your string between the gap you’ve chosen, and wrap the string a couple of times around the second stick, then tie a simple knot. Continue wrapping and knotting the string until you reach the top stick. Then repeat on the other side, being careful to wrap the string the same number of times, and keeping roughly the same gaps between sticks.
9. To complete the wall hanging, tie your tassels to the bottom driftwood stick at equal distances apart, but at different lengths. Then tidy up all the loose bits of wool and string, and hang up on your wall.
For another great driftwood craft idea, check out our DIY jewellery hanger. And for 100s more crafting ideas check out our Teens: Creative arts and crafts section.


