Are you looking for a fantastic school holiday project for your budding artists at home? Well, I’ve got the perfect project for you, that’s tried and tested. This art project is perfect for school kids aged 8 to 13.
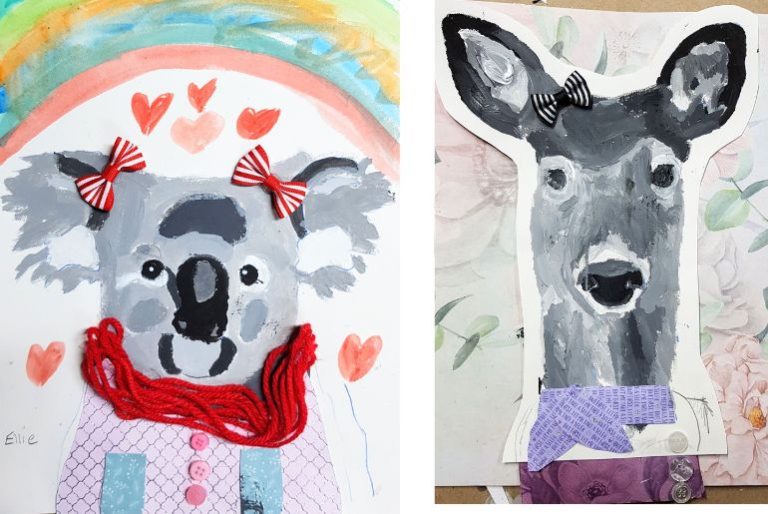
I’ve tried out this project with my own kids, taught it in schools, and even shared it with a group of art students I had. They all love it! It’s a three-part adventure—first, you create your very own grey value scale, then you use that to paint your awesome image, and lastly you add a bit of collage to your animals portrait masterpiece.
These creations aren’t just cool, they also make fantastic gifts and beautiful pieces of art that your kids can brag about, especially once they’re framed. And even though this feels like just a really fun art project to do at home, your kids will be learning some fundamental painting skills!
When I was working on this idea I got quite inspired by some awesome artists, Yago Partal and Gillie and Marc – you might want to show your kids their work too, for some inspiration.
These are just some of the artworks created by children I’ve taught this project to:
How to Create an Animal Portrait Oncluding a Value Scale
You will need:
Carbon paper/transfer paper (you’ll find this at art supply stores or Warehouse Stationery in NZ)
Thick acrylic paper for painting on
Pencils
Bulldog clips
20cm by 5cm strips of acrylic paper
Resene test pots in Black and White
Glue
Thin paint brushes
Black and white pictures of animals (these should be head and neck shots)
Decorative paper to make the clothes
Water colour paint or Resene test pots for the background
Mixing trays
Creating a value scale – (this step is optional but really helps train the eye)
1. Pre cut strips of paper for your child about 15cm long and 5cm wide. Add some Resene white and black paint to mixing trays. You could use icecream container lids, or small yogurt containers.
2. Paint a stripe of pure white along the top of the paper strip. This is the lightest value in our value scale, or value 1.
3. Now mix a small amount of black with the white, just add a few blobs at a time, less is more. This becomes value 2. Add some more black, value 3, and so on.
4. Each time they create a new value, have your child paint a stripe along their value scale, from 2 to 9. Value 10 at the bottom of the scale will be pure black.
5. Once the value scales are dry, they can number them with a pencil from 1 to 10. Some kids may have a very dark gradient, which is OK. But try and encourage them to start lighter and get consistently darker through their scale.
Step two Creating a carbon Copy of your image
1. Using two bulldog clips attach your thick paper, carbon paper and image together in that order.
2. With a pencil have your child draw around the whole outline of their image first, then draw in the eyes and mouth.
3. Finally, get them to look at the shapes made by the different shades and draw in some of these shapes too. Note: it’s important they don’t lift the paper up to see how their tracing is going. This can result in their paper and image moving, and this will create a messy copy that’s harder to number.
4. Once they have drawn in the various shapes, and transferred them through the carbon paper, they can begin to number them from 1 – 10 using their own value scale as a numbering guide.
Painting Time
Painting their animals now is just like painting by numbers. But it’s even better because your kids have created it themselves!
1. I find it easiest to start with either their lightest colour or their darkest colour first. So paint in all the 1s, or 10s, before beginning the next value. This also means they’re using pure black or white to begin with and can start colour mixing next.
2. Once they’ve painted in all the blacks, or whites, they can use their value scales to start mixing up the next colour (either 2’s or 9’s depending where they started). Mix a colour as close to the grey value scale as you can, then paint in all those numbers with that colour.
3. Continue painting in all the different grey scale values until the head of the animal is finished and a small part of the neck (there’s no need to do the whole body as this will be covered by collage materials next).
4. Finally, paint in a background using watercolour paints, or use acrylic test pot paint, and just water it down 50/50 to make a wash effect.
Collaging the Animal Body
1. To collage the body use the carbon copy paper and trace the outline of the body onto your chosen decorative paper. This helps make sure they ‘clothes’ are a perfect fit for the animal head.
2. Cut out the clothing and use a glue stick or hot glue gun to attach to the image.
3. Now let your kids embellish with, wool, buttons, bows etc. Use the hot glue gun to stick on to the clothes.
All that’s left to do now is to hang or frame and hang your child’s masterpiece in a prime spot on the wall!
For hundreds more art ideas check out our Tweens and Teens: Creative arts and crafts section.


