I’ve just discovered the joy of making my own DIY bottle necklace. The initial idea to make one was because I was thinking about creating some more craft for Matariki.
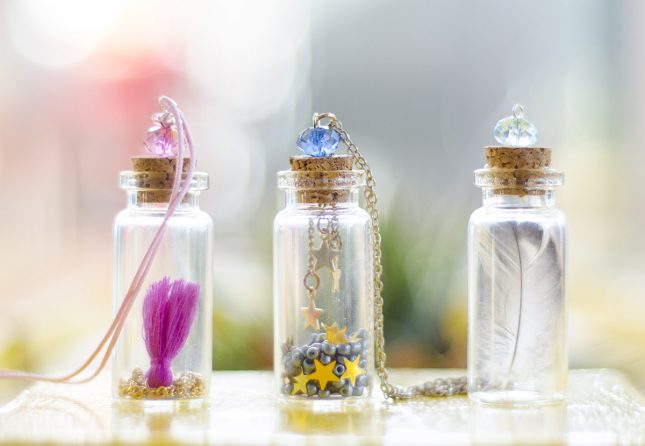
This is what got me interested in trying to make a bottle necklace with some beautiful stars hanging in it as a symbol of Matariki.
This one idea ledd to me making a small collection of mini DIY necklace bottles. In fact my daughters 5th birthday is coming up and we’re all going to be making them as part of her Doc McStuffins party. For the party however, they will become the kids’ Doc McStuffins special medicine charms for their toys!
These would make great gifts for Mother’s Day, and family friends. They also make a fantastic rainy day activity to do with your kids. You can pretend you’re making special potions or find special small trinkets around the house to use in them.
Also if you have any old, junky, jewellery lying around repurpose it into a stylish new piece. I did just this for one of the bottles you can see in the photo below. The pink tassel is an old piece of broken jewellery.
You can also place special finds you’ve gathered from nature. For one of my pieces I placed in a small feather. You could also use tiny shells and stones found at the beach, or small dried leaves and flowers.
There are a number of ways to make these necklaces, so below I’ll give you a list of what I used, and a run down on how I made one of them. Basically you can’t get it wrong, just experiment with these, and have fun!
DIY Bottle Necklace
You will need
Necklace Chain (this can be bought from most emporium stores, or you can repurpose an old chain)
Small glass bottle
4 Eye pins
A selection of charms
A selection of beads
Star glitter
Glue
4 Jump rings
A drawing pin
What to do
To make the Matariki-inspired Necklace bottle charm follow the below instructions:
1. Fill your glass bottle one third full with a mix of metallic silver beads and gold star glitter.
2. To attach the 3 stars to the bottom of your cork you’ll need to cut 1 short length of chain, and 1 slightly longer (the third star attaches straight to an eye pin). To attach the 3 eye pins to the cork you’ll need to use your drawing pin and make 3 holes in the bottom. This makes it easier to push the eye pins into the cork. It’s a good idea to trim your eye pins first otherwise they pop through the top.
This shows the end of the eye pin that will need to be trimmed:
This shows the shortest star attached directly to the eye pin:
3. At the top of the cork, thread 1 small, and 1 larger bead, onto the eye pin, and push it though the middle of the cork. Again use the drawing pin first to make a small hole. Once the eye pin is through, bend the end over to secure it.
4. Glue the cork into the bottle using a strong craft glue.
5. Let this dry completely, preferably overnight.
I hope you love making these bottle necklaces as much as I did. For more craft ideas check out our DIY Jewellery hanger and these 9 cool craft ideas for teenagers. Or, for hundreds more craft ideas check out our Creative arts and crafts section.


